
Wedding flowers play a huge, yet fleeting, role in our wedding – we spend a great deal of time (and money) curating the perfect designs that express who we are, that pulls all of the elements of our wedding together, and are central to our wedding attire.
And now it is becoming increasingly popular to preserve our most special flowers, so they become a tactile memento to hang on our walls, and act as a wonderful and visual reminder every time we walk into the room where it hangs. All your hard work creating the perfect floral arrangements with your wedding florist can keep on giving for years to come.
Having your bridal bouquet pressed and framed, however, can cost more than the bouquet itself. So here I am going to give a quick run through of how you can do it yourself if it is something you’d love to try your hand at!

You will need:
- Fresh flowers from your wedding day
- Sharp scissors or secateurs
- A flower press (or heavy books)
- Parchment paper (really any paper will do, but plain paper is best so no ink leaks onto the petals and, if using kitchen towel, use towel with no dimples or patterns as these will be pressed into your petals. Parchment paper is best as it is very absorbent and you won’t need to change the paper as often)
- Frame of your choice
- PVA glue
- Cocktail stick or small paintbrush
- Tweezers
Step one: The fresher the flowers the better for this. I always recommend my brides keep their bouquets in water when they are not being used on the wedding day – this keeps flowers as fresh as possible.
Step two: Prepare your flower press. If you are using a pre-made press it will be made with boards that clamp together, or you can place your flowers in between the pages of a heavy book (if using the book option, have some newspaper handy as well, placed between the parchment paper and the page, to absorb excess moisture so as not to ruin the book pages).
Undo your press and take it all apart until you are down to the bottom board – place your first piece of parchment paper on here.


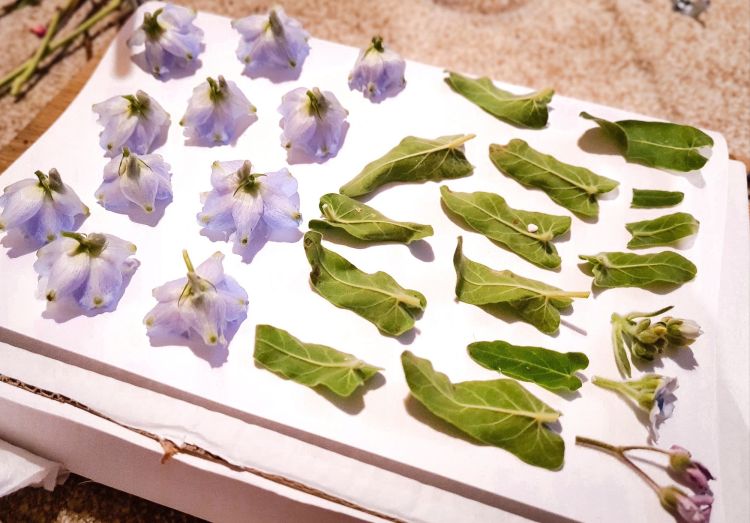
Step three: Snip the flower heads off of their stems. (You may like to keep the stems on some of the flowers, this works best with dainty flowers). Some flowers are already pretty thin and will press easily and some are much bulkier and will take longer to dry.
I recommend placing flowers of the same sort of size together on one board – if you have bulky flowers placed next to very slender flowers, the smaller flowers will not press properly.
(Side note: some flowers will need to be taken apart to dry properly. In particular roses – it can be helpful to take away some of the petals and dry these separately. If you try to dry a whole bulky flower it will take too long for the moisture to be drawn out and the petals will go mouldy.
You will see advice online that some flowers do not press well, in particular dahlias. This is true if you try to press the whole flower in one piece. For the best results, the individual petals need to be taken apart and dried individually, a very tedious and time consuming process, but well worth the results).
Step four: As you fill the first layer of parchment paper, add more parchment paper over the top of these flowers, followed by the next piece of board from your press (or a chunk of book pages) and add the next piece of parchment paper to the top of that board, and start the process again, until you have as many flowers as you want to press in the press. Screw the boards tight in place and store your press in a warm and well ventilated area.
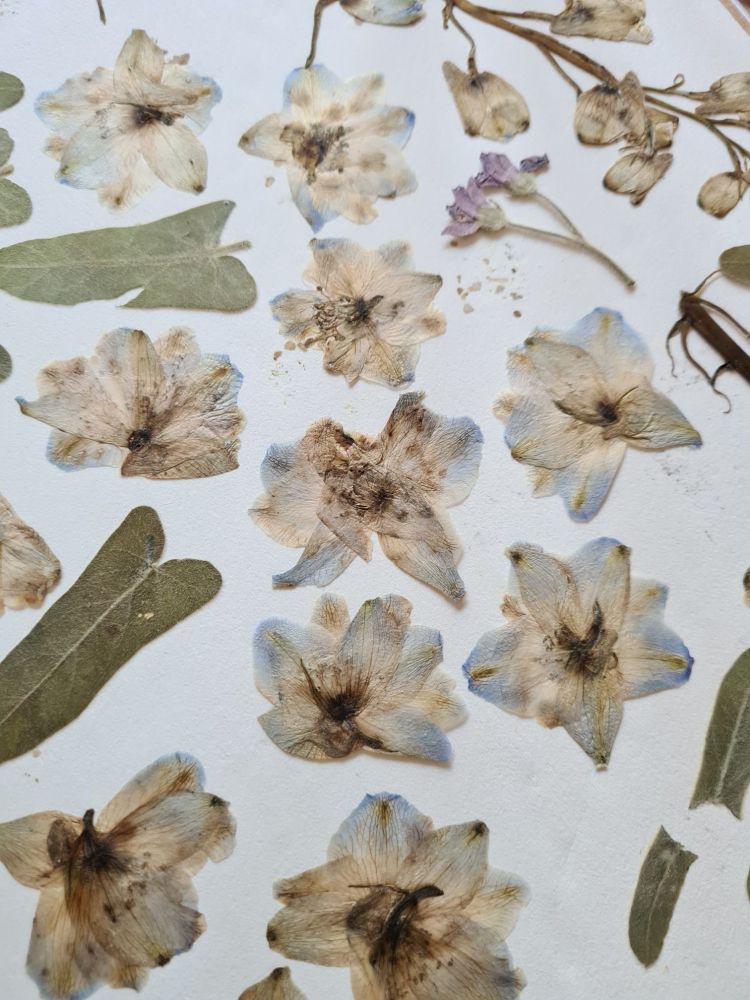
Step five: At first you will want to check your flowers every 3 days or so, carefully lifting each board and piece of paper to check how the flowers are drying. If any of the paper is particularly damp, change it for fresh paper. You can let the damp paper dry out and reuse it later. This process will need to be repeated every 3 or 4 days for the first two weeks, then you can check them every week after this until the flowers are completely dry. All in, it takes about 2 months.
Step six: Your flowers are completely dry when they are paper thin, are not floppy at all, feel dry to the touch, and the paper is not longer damp around them. It is really important your flowers are completely dry before creating your artwork.
When ready, take your flowers out of the press and create a practice arrangement on the table/piece of paper or board the same size as your frame. Do this by placing the flowers where you think you’d like them to sit in the frame, without gluing anything in place first. Have a look online, or on Pinterest, for inspiration.


Step seven: When you are happy with your design you can get the glue out. A very thin paintbrush or the end of a cocktail stick is ideal for placing tiny amounts of glue on each petal and the tweezers are great for holding the delicate flowers.
If you are layering flowers over one another, you need to start with the flowers at the bottom of the artwork. Dab a tiny piece of glue on each petal and then place that flower onto your backing board (from the frame). Hold it in place for a few seconds while the glue becomes tacky and holds the petals in place.
(You only want a small amount of glue in any one place so that it can dry quickly – too much glue will take too long to dry).
Step eight: Keep going in this fashion until all the flowers you want to use are stuck onto the board, any flowers taken apart and petals individually dried will need to be built back up to resemble the original flower at this stage. This can be a time consuming process, it doesn’t need to be done all in one go. When you are happy with your finished art work, leave to dry for a couple of days in a warm and well ventilated area, before placing the board back into its frame.
When you hang your pressed flowers on the wall, keep out of direct sunlight and away from heat and moisture, to give your flowers the ideal conditions for longevity. If your budget allows, it is best to buy a frame with conservation glass – a wonderful non reflective surface that has a UV filter for extra protection.
Step nine: Enjoy your preserved flowers for years to come!

So, what do I do at The Honey Seeker Floral Design?
Well, as a wedding florist I love to get really creative in designing your wedding flowers, taking inspiration from your love story and weaving it throughout your arrangements.
Your bouquets will come in a beautiful, repurposed, glass vase, for you to use on your wedding day to keep your blooms fresh and so your flowers can double up as decoration on your wedding day.
I have a chat with you before your wedding, to determine exactly how you want your framed flowers to look post-drying.
I arrange collection of your bouquet the day after your wedding, and put them in the press that same day, to ensure the best outcome.
I follow the steps above, I take the time to pull apart flowers and dry individual petals so they best retain their colour, and I check them regularly throughout the drying process.
I work with my local picture framers – Wax Fine Art Framing, in Bruton – to ensure you are receiving the best quality bespoke picture frame. Frames are made to your specifications, hand made right here in Bruton, and finished with conservation art glass to offer maximum protection to your flowers.
I keep in regular communication with you throughout to update you on your flowers, and when your artwork is complete I will arrange delivery.
I hope this post helps you on your way to creating something beautiful with your wedding flowers. Or, if it sounds very time consuming (and we all know how strapped we are for time), get in touch and let me create your artwork for you!
Get in touch here!
Thanks, Esme x

